
Built-In Brilliance for Budget Studio Living

Discover how space-saving built-ins for studio apartments on a budget can transform limited square footage into a calm, capable home. We’ll share practical layouts, thrifty materials, and real-world tricks that stretch every inch. Expect approachable plans, renter-friendly ideas, and creative finishes you can tackle this weekend. Join the conversation, ask questions, and post photos of your progress—together we’ll make small-space living beautifully efficient without draining your wallet or sacrificing personality, comfort, or long-term flexibility.
Measure, Map, and Maximize Every Inch
Great built-ins begin long before a saw blade spins. Clear a floor, grab two tapes, and document obstacles, outlets, heaters, and door swings to avoid heartbreaking misfits. Map circulation so drawers open freely and friends can pass without sideways shuffles. Use painter’s tape, gridded paper, or free planning apps to visualize layers and heights. Share your sketches with us for feedback, and learn from others who reshaped awkward corners into quiet storage heroes that live kindly with daily routines.

The Two-Tape Approach
Measure fixed constraints with one tape, then chart movable zones—stools sliding, chairs turning, and mattress corners swinging—using another. Note clearances for elbows and knees, not just rectangles on paper. Mark heights for brooms, guitars, or suitcases, ensuring vertical cubbies fit real belongings. Taking these steps prevents buying cabinets that almost work, and saves repeats at the hardware store. Share your measurements, and we’ll suggest small adjustments that harvest hidden pockets without crowding your daily flow.

Cardboard Mockups That Tell the Truth
Build full-scale silhouettes with cardboard and painter’s tape to preview mass, edges, and inconvenient corners. Test a Murphy bed’s arc, a sofa’s arm height, or a bench depth that truly supports reading and laptop posture. Walk around, set a tray down, and check line of sight for video calls. One reader discovered her nightstand blocked a closet door; she trimmed two inches from the plan and gained effortless mornings. Small revelations here prevent expensive surprises later.
Sleep, Sit, Store: Multi-Tasking Built-Ins
When a single room performs every role, let furniture handle multiple shifts with grace. Combine a platform bed with deep drawers, a window banquette that hides bulky items, and a closet-wall desk that folds away for mental clarity. Choose dimensions guided by your routines—reading, yoga, hosting, or crafting—so storage supports habits instead of shuffling them aside. Comment with your daily patterns, and we’ll suggest stackable modules and thrifty hardware that flex through mornings, work sessions, and restorative evenings.
Platform Bed With Deep Drawers
Stack plywood boxes on a simple plinth and add full-extension slides for linens, seasonal clothing, and extra blankets. A vented mattress deck keeps airflow healthy, while a minimal headboard frames lighting, books, and charging. Add a narrow toe-kick LED strip for soft midnight guidance without glare. Cost-saving tip: use shop-grade birch plywood, sand carefully, and seal with water-based polyurethane. Comment for a cut-list template and budget breakdown that balances durability with realistic weekend build time.
Window Nook Banquette
An L-shaped banquette tucks storage under hinged seats, turning a sliver of wall into breakfast seating, laptop station, and reading cove. Build boxes to the height of your cushions and include finger pulls to avoid visual clutter. If a radiator occupies the area, integrate a ventilated grille and maintain safe clearances. Use washable covers for spills and craft sessions. Share photos of your window wall and we’ll suggest cushion thickness, hinge placement, and color accents that amplify daylight.
Above-the-Door Library
A shelf spanning the doorway turns forgotten air into a bright little library. Anchor 1×2 cleats into studs or solid blocking, then top with plywood edged neatly for a finished look. Plan for bookend storage and integrated stops to prevent tumbles. Paint the same color as the wall to let volumes float, or choose a contrasting hue that frames the passage. Readers report the shelf doubles as a plant perch, drawing eyes up and enlarging the entire room.
Pegboard That Outgrows Gadgets

Install a classic pegboard on 1×2 spacers so hooks seat securely and airflow protects walls. Start in the kitchen with pans and strainers, then expand to craft supplies or tools as needs change. Paint the board your wall color to calm visual noise, or stripe it for playful rhythm. Use deep hooks for colanders and shelves for jars. One tight galley added twenty percent storage in an afternoon. Share your layout sketch, and we’ll suggest hook kits that fit perfectly.
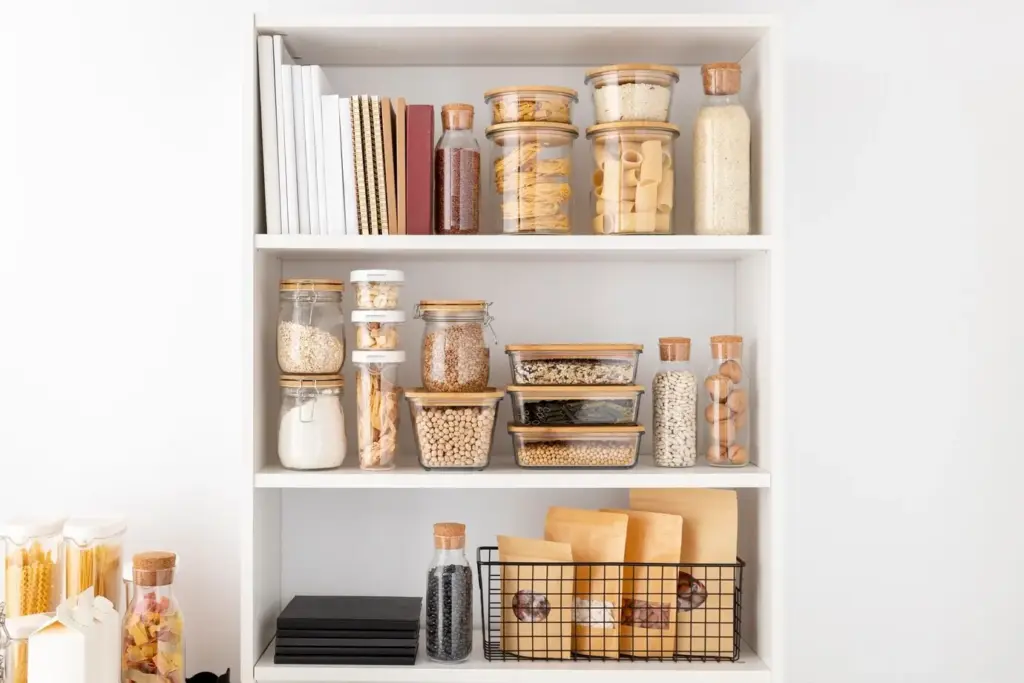
Shallow Wardrobes Between Studs
Capture wall depth by recessing slim cabinets between studs for scarves, shoes, spices, or cleaning tools. Map utilities carefully and add plywood backers where studs are missing. Finish with a slim face frame and doors that align with adjacent trim so everything looks original. For renters, build shallow surface-mounted boxes that mimic the effect and unscrew cleanly later. Post your wall measurements, and we’ll recommend hinge types and door styles that minimize projection yet close quietly every time.
Smarter Kitchens on Shoestring Budgets
Your kitchenette can be compact, hard-working, and graceful without expensive custom millwork. Focus on narrow pull-outs that corral pantry goods, toe-kick drawers for trays and boards, and rail systems that replace bulky racks. Keep counters clear for prep and let vertical panels carry the load. Mix stock cabinets with a homemade filler panel to reach the wall cleanly. Share your appliance sizes and cooking style, and we’ll propose low-cost configurations that keep cleanup quick and weeknights calmer.

Rental-Friendly ‘Built-In’ Illusions
Yes, you can create the tailored look without permanent changes. Combine freestanding bookcases, removable backer panels, and painter’s caulk to achieve clean lines that seem original to the architecture. Use tension systems where drilling is limited, and secure heavy pieces to hidden furring strips instead of walls. Keep a repair kit with spackle and touch-up paint to protect deposits. Show us your lease constraints and landlord preferences, and we’ll customize strategies that photograph beautifully and come apart easily.

All Rights Reserved.